
I’m what you might call a “random quilter,” meaning I don’t actually follow patterns, but instead just sort of sew on my own terms. I take pieces of fabric, squares and triangles mostly, start stitching them together, and see what happens. The scraps grow into larger squares, proliferate into a massive stack, and, eventually, get laid out on the floor, where I arrange and rearrange them until I figure out what it is I’m going to make. I know it sounds odd, but it seems to work for me.
One day while digging around in my cabinet of craft supplies, I came across some random completed squares stuffed way in the back. I couldn’t remember making them, but there were more than 20 of them, predominantly made of fabrics salvaged from old button-down shirts my sons had outgrown or my husband had discarded.
Some of the squares I’d made into pinwheels, and some into bow ties, and they were all different sizes. I laid out the motley collection on the floor, examining them from one angle and then another. Before long, I knew I wanted to make a tablecloth for the backyard picnic table. Using the plackets (“placket” is a term used to refer to the double layers of fabric that hold the buttons and buttonholes) from the shirts across the tablecloth’s center would accommodate the picnic table’s umbrella, which would make it easier to change out the tablecloth for washing.
My picnic table measures 38 by 80 inches, so I made my tablecloth 46 inches wide by 99 inches long. Before you start this project, you’ll first need to measure the table you want to cover, and then adapt the measurements appropriately.
For construction purposes, think of this project as making two small quilts that’ll butt up next to each other, and will then be connected with a strip of buttons and buttonholes sandwiched along the short edges where they join.
Your blocks can be any size, since borders will true them up before you start assembling. My squares ended up being about 10 inches unfinished.
In case you don’t have a stash of completed blocks, we’ll start from scratch. Button-down shirts are great for making the blocks, but any old scraps you have on hand will also work. You will, however, need two button-down shirts for the button strip.
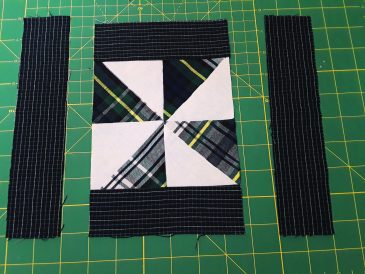
Step 1: Make Pinwheel Blocks
The pinwheel design is made of 8 right triangles, all of the same size. For each block, you’ll need 4 “A” pieces and 4 “B” pieces.
1A) Sew an “A” triangle to a “B” triangle along the long edge. Repeat with remaining “A” and “B” pieces. Press. You should have 4 squares.
1B) Lay out the 4 squares in the pinwheel pattern as shown at right.

1C) Sew together top row. Press. Sew together bottom row. Press. Sew top and bottom rows together.
1D) Repeat Steps 1A through 1C until you have the correct number of blocks needed for your tablecloth.
Step 2: Make Bow Tie Blocks
The bow tie design is made up of 5 squares and 8 right triangles. The triangles are sewn together along the long edge to make 4 squares. The original squares and the sewn squares should be the same size. The pieces are arranged in 3 rows of 3 squares, known as a 9-patch block. For each block, you’ll need 4 “A” triangles, 4 “B” triangles, 3 “A” squares, and 2 “B” squares.
2A) Sew an “A” triangle to a “B” triangle along the long edge. Repeat with remaining “A” and “B” triangles, making 4 squares. Press.
2B) Lay out all 9 squares in the pattern.

2C) Sew together top row. Sew together middle row. Sew together bottom row. Press.
2D) Pin top row to middle, and sew; pin bottom row to middle, and sew. Press.
2E) Repeat Steps 2A through 2D until you have the correct number of blocks needed for your tablecloth.
Step 3: True Up All Blocks
To true up your blocks simply means to make them all the same size.
3A) Trim your largest block, making it as square as possible. This is the size you’re going to make the rest of the blocks.
3B) Add borders to your smaller blocks — 1⁄2 inch, 1 inch, 2 inches, or more as needed — to make them the same size as your largest block. Cut the borders as desired, and sew on the top and bottom borders first, then press and trim. Next, sew on the side borders, and press and trim.
Step 4: Create Desired Pattern & Add Lattice Strips
Once you’ve made and trued up enough quilt blocks to create your desired size of tablecloth, lay them all out on the floor, and arrange them, rearranging as needed, until you find a pattern that’s attractive to you. (For my picnic tablecloth, I used a total of 24 squares, arranging them in 8 rows of 3 blocks each.) Then, it’s time to add your lattice strips.
4A) Cut lattice strips to your desired size — typically 2 to 4 inches wide, and as tall as a single block. (I used 3-inch-wide strips of white fabric, and made 16 strips for this project.)
4B) Sew the blocks and lattice together, into rows. You should have an even number of rows, as you’ll want half of them to go on one side of the umbrella, and half on the other side.

Step 5: Connect Your Rows
Now you’ll cut sashing, and use it to connect your rows of blocks.
5A) Cut long, horizontal strips of sashing, making them the same width as your lattice strips. Working with half of the tablecloth, sew the rows together with a strip of sashing in between.
5B) Sew the rows of the other half of the tablecloth together, again using a strip of sashing in between them. You should now have two separate sections to your tablecloth.

Step 6: Attach Borders
Lay your project out on the designated table, placing one section on each side of the umbrella. This will help you decide how wide to make your outer borders. You want them to be wide enough so the fabric hangs over the edge some. (I made all of my borders 7 inches wide. The side borders and end borders don’t have to be the same width; the four side borders should all be the same width, as should the two outer end borders.)
6A) Cut 2 side borders for each section, for a total of 4 side borders. Sew them on.

6b) Cut 2 outer end borders — 1 for the outside edge of each half of the tablecloth. Sew them onto the tablecloth halves.

6c) Cut 2 borders, each 2 inches wide, for the inside ends (the pieces that will eventually be attached with a strip of buttons). Sew them on.

Step 7: Add Backing & Anchor Project
Now it’s time to add backing fabric and prepare to finalize your tablecloth.
7A) Cut 2 pieces of backing fabric to the same size as your tablecloth sections. (Piecing is fine, if that’s what you prefer.) You’ll now have 4 large pieces of fabric — the 2 tablecloth sections and the 2 backing pieces. (I didn’t use batting, as this project will be sturdy enough without it.)
7B) Iron the edge of the inside borders to the wrong side, about 1⁄2 inch. Repeat with the remaining 3 pieces of fabric, and then topstitch each piece along the
ironed edge.
7C) With right sides together, sew 1 tablecloth section and 1 piece of backing together along 3 sides, leaving the topstitched side unsewn. That side is where your button strip will go. Repeat with remaining tablecloth section and remaining backing piece. Clip excess fabric from the corners, turn right-side out, and press.

7D) Sew a few seams across the width of each tablecloth half, using the sashing strips as guides. You don’t need to sew all the way to the edge, as this is just for anchoring the pieces together so they hold up well when laundered.

7E) Topstitch around the remaining 3 sides of each tablecloth half.

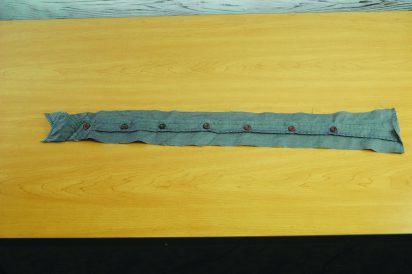
Step 8: Create & Add Button Strip
You’re now ready to make the button strip, which will connect the two tablecloth sections together.
8A) Cut out the plackets. (See “How To Cut Out the Plackets” below.)
8B) Sew the plackets in place to create your button strip. (See “Add the Button Strip” below.)
How To Cut Out the Plackets
You’ll use the plackets from two button-down shirts to create a button strip to connect the two pieces of the tablecloth. Be sure to choose shirts in patterns and colors that complement each other.
1. Button both of the shirts all the way up, and flip up the collars.
2. Lay one shirt flat on a table or other flat surface. Leaving 1 inch on the right side of the button strip, cut up the length of the shirt, all the way from the bottom hem up through the collar.

3. Repeat Step 2 on the opposite side, again leaving 1 inch on the left side of the button strip.
4. Repeat Steps 2 and 3 on the remaining shirt to remove that button strip.
Add the Button Strip
1. Tuck a placket with the buttonholes into one section of the tablecloth, and a placket with the buttons in the other section. Button them to make sure they line up, and pin them in place, tucking the ends under so no raw edges show.

2. Repeat with the remaining two plackets.
3. When you’re sure everything matches up, unbutton, flipping the collar up, and carefully sew the plackets in place. Tack down loose ends as needed.
Lynn Bowen Walker is a DIY enthusiast and author. You can find her book Queen of the Castle: 52 Weeks of Encouragement for the Uninspired, Domestically Challenged, or Just Plain Tired Homemaker on Amazon.


