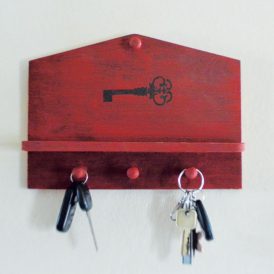
When I saw this pegged shelf at a garage sale, I thought it would make a nice key rack. However, I knew it would take some work, because it looked as though someone else had already attempted to repurpose it by painting it dark blue. I had originally planned to sand off as much blue paint as possible, so I was really excited to use the chalk paint on it, since you don’t have to sand or prepare your surface. It looks great hanging up by the back door.
Directions:
Wipe down the shelf with a clean cloth and glass cleaner, and let it dry.
Cover the shelf with a coat of chalk paint using a craft paint brush. Since my shelf was dark blue, I chose a dark color of chalk paint to make sure it covered. It covered for the most part, although some of the blue bled through. I didn’t like how it looked, so I gave it a second coat. The blue bled through again in places, but I liked how it looked the second time, so I stopped with two coats of paint. If you, too, have a dark color of paint under your chosen color of chalk paint, and you don’t want the first color bleeding through, or if your first or second coat isn’t dark enough for your taste, add a third coat. Be sure to let the paint dry for at least two hours between coats.
Once the paint is completely dry, you can either call it finished, or you can add a design using a stencil.
I used a stencil in the shape of an old church key. I taped down the stencil, and then used a dauber sponge brush. Then I let the paint to dry completely.
I didn’t add a coat of wax, but you can if you like.
I used FolkArt® Home Decor Chalk Paints 34153 Imperial (for the shelf) and 34165 Java (for the skeleton key, Plaid FolkArt® stencil 34952)
Want to learn about more creative crafting projects? Check out 10 DIY Craft Projects.


